The portrait photographer's lighting guide
As far as equipment goes, it should be remembered that a photographer doesn’t need a top-end DSLR to create stunning portraits. A better camera might allow you to take pictures in lower light, at a faster speed, or with better resolution, but the progression of camera improvements does not necessarily correlate to the success of your work. Rather, where you need to focus your attentions is on light.

A mix of in-camera motion blur and flash.
For some photographers, lighting is the very first consideration, above anything else. Photographs are, essentially, constructed from different volumes and qualities of light. Others, however, tend to think first about the setup and intended mood, and then tweak the lighting around those elements. Both approaches are valid, and depend on your preferences. Most importantly, it is about producing the image that you imagine.
Natural lighting
You could spend your whole career using natural lighting if you so wished. Lighting gear simply gives you more control in creating a certain ambience wherever and whenever you want.
Sunset and sunrise can be rewarding times to shoot because the gentle sun, low in the sky and warm in appearance, becomes a magical source of lighting in itself.

This portrait was shot in the corner of a dark, run down building, and was lit by bouncing the light from outside using a reflector.
In any level of sunlight, there are great benefits to using a reflector—and being such a cheap and minimal piece of equipment, it’s recommended to take along a reflector on a shoot, especially if you are not taking lighting equipment. For both indoor and outdoor shoots, a reflector can have a great effect, filling in shadows and going a long way to illuminating a scene.
HDR (High Dynamic Range
When it comes to lighting a high-contrast set-up, where for example the subject is near strong light entering through a window or against a bright sky, there are different lighting options to consider. You might expose for the background and light the subject with flash, but alternatively (or when flash is not possible), choose to auto-bracket the image for an HDR image.
Here, you would take multiple shots (usually three) of the same frame, and merge them using a piece of software that produces HDR images from different exposures of the same scene, for example Photomatix. By creating an HDR image, it is possible to achieve the correct luminance and exposure across all parts of the frame, where the camera would usually have to choose between exposing for the shadows or the highlights.
HDR is not generally observed to be suitable for portraits because an animate subject moves very slightly between the shots, inevitably causing ghosting. Where possible, try to keep the model in a still enough position so this doesn’t happen. You might find that this is easiest when your model is positioned lying down or resting firmly against something, sheltered from breeze.
Should you need a solution for ghosting, try masking over ghosted areas from one of the original exposures, basically inserting a small non-HDR element into the image and applying subtle tonal changes to make it match.
Improvised lighting
Improvised lighting sources are those that can be referred to as objects that emit light within the frame, but which aren’t technically natural or professional lighting. These might include flashlights, candles, lamps, a stage spotlight, or even an operating light in a derelict hospital.

This portrait was shot with just the light from the window and the ambient light from a modeling lamp.
Most of the time, these behave in the manner of ambient or natural lighting, which often means that you can engross yourself in the mood of the environment without worrying about the myriad possibilities present in introducing a new light element that can be manipulated in countless ways. At other times, the light is either too weak and needs creative post-processing (for example candlelight), or too strong and needs careful shooting in case of over-exposure. You need to observe and adjust accordingly.
Constant lighting
Constant lighting is similar to the lighting quality achieved when using improvised sources. It has the same tungsten (orange) appearance, and offers the same advantage of the ability to see the actual effect of the lighting in real time. Depending on your intention for the final image, it is usually necessary to change the white balance to tungsten so that the images are not over-saturated, especially if the image is a fashion portrait showing a lot of the model’s skin and face.
Flash lighting
Finally, there is flash lighting, which you can put to use in both discreet and subtle and big and bold ways.
Flash can be useful when your aim is to pull the subject away from the background to outline them cleanly and sharply—often the norm in fashion portrait photography.

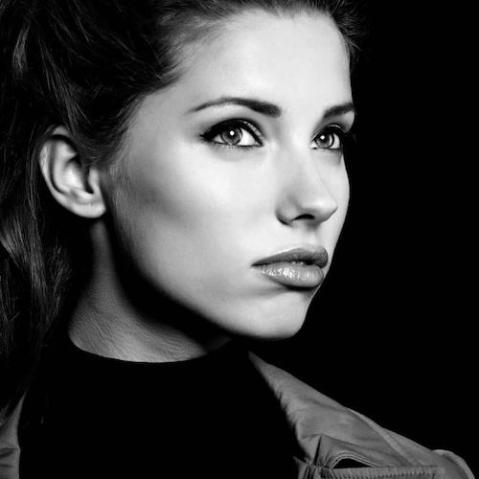
Model Ariana lit with a Photoflex TritonFlash inside a small octodome. The use of flash in this portrait was appropriate, giving the model a striking appearance amongst a dark, busy environment.
A split-lighting technique can be highly effective, whereby the flash is positioned to one side of the subject, crossing the path in front of them, increasing the image’s depth and the model’s stature.
Flash can be used to create bold and dramatic shadows, but also to create subtle effects, such as catch-lights. A well-placed reflector can help here, too.
Creative Portrait Photography by Natalie Dybisz offers an extensive behind-the-scenes look at the creative process of one of today’s most exciting and popular professional portrait photographers and gives you everything you need to step up your portrait photography to take photos that express the style and personalities of both you and your subjects. With over 150 portraits and a showcase chapter featuring work from five top portrait photographers explaining how each shot was achieved, you’ll be inspired to take your portrait photography to a whole new level of creativity.
[one_whole boxed=”true”]
 Creative Portrait Photography, by Natalie Dybisz
£8.99 Download the PDF now!
This PDF version retains the styling of the original print book.
RRP for print edition: £17.99
[button color=”Accent-Color” size=”small” url=”https://www.ilexinstant.com/product/creative-portrait-photography/” text=”Digital Edition”] [button color=”Accent-Color” size=”small” url=”http://www.amazon.co.uk/dp/1907579907?tag=ilexpresscom-21&camp=1406&creative=6394&linkCode=as1&creativeASIN=1907579907&adid=1ZDQZ2S92X13VEXFRDDJ&&ref-refURL=http%3A%2F%2Fwww.ilexinstant.com%2Fproduct%2Fcreative-portrait-photography%2F” text=”Amazon UK (Print)”]
[button color=”Accent-Color” size=”small” url=”http://www.amazon.com/Creative-Portrait-Photography-Natalie-Dybisz/dp/1454704039/ref=as_li_qf_sp_asin_til?tag=ilexinst-20&linkCode=w00&linkId=&creativeASIN=1454704039″ text=”Amazon USA (Print)”]
[/one_whole]

